"/><stop offset="1" stop-color="rgb(30, 114, 238)"/></linearGradient><linearGradient id="YDLE9MDNA-538914978-linear-gradient" x1="0" x2="1" y1="0.23559796048780463" y2="0.7644020395121953"><stop offset="0" stop-color="rgb(29, 109, 231)"/><stop offset="1" stop-color="rgb(64, 165, 255)"/></linearGradient></defs><path d="M 40.799 12.178 L 42.281 13.031 C 44.621 14.378 44.641 17.746 42.318 19.122 L 39.742 20.646 L 39.228 20.95 L 28.769 27.138 C 26.489 28.487 23.659 28.503 21.365 27.178 L 20.282 26.554 L 3.726 16.996 L 1.375 15.639 C -0.447 14.588 -0.461 11.962 1.35 10.89 L 4.274 9.16 L 7.505 7.249 L 11.499 4.942 L 11.45 4.915 L 19.756 0" fill="url(%23tEGW9pzOz-538914978-linear-gradient)" height="28.161004175370262px" id="tEGW9pzOz" transform="translate(0.075 25.806)" width="44.04821768736515px"/><path d="M 44.425 33.699 C 44.438 35.532 43.489 37.237 41.924 38.19 L 39.641 39.581 L 27.799 46.587 C 26.374 47.43 22.751 46.685 21.318 45.853 L 29.657 41.113 C 32.12 39.713 32.148 36.174 29.708 34.734 L 11.576 23.686 L 3.184 18.841 L 2.328 18.346 C 0.888 17.516 0 15.98 0 14.316 L 0 6.967 C 0 5.51 0.784 4.166 2.052 3.448 L 8.143 0 L 21.811 7.772 L 30.202 12.617 L 41.791 19.308 C 43.311 20.186 44.258 21.8 44.281 23.555 L 44.4 32.63 L 44.418 32.63 L 44.426 33.698 Z" fill="rgb(30, 114, 238)" height="46.95812943895389px" id="hW_wHJ51K" transform="translate(0 7.06)" width="44.42615178571429px"/><path d="M 43.885 32.784 L 19.454 18.679 L 11.063 13.835 L 1.856 8.519 L 1.431 8.284 C -0.457 7.24 -0.482 4.534 1.387 3.455 L 7.371 0 L 21.297 7.927 L 29.689 12.771 L 41.378 19.306 C 42.833 20.119 43.743 21.647 43.764 23.313 L 43.886 32.784 Z" fill="url(%23YDLE9MDNA-538914978-linear-gradient)" height="32.784095535714286px" id="YDLE9MDNA" transform="translate(0.514 7.223)" width="43.88573944832064px"/><path d="M 42.569 15.442 L 23.948 26.195 C 22.574 26.988 20.883 26.988 19.51 26.195 L 1.553 15.827 C -0.518 14.631 -0.518 11.643 1.553 10.447 L 17.846 1.04 C 20.249 -0.347 23.209 -0.347 25.612 1.04 L 42.569 10.831 C 44.344 11.856 44.344 14.417 42.569 15.442 Z" fill="rgb(54, 156, 255)" height="26.78968948214286px" id="Y_lxD7SKk" transform="translate(0.47 0)" width="43.90056611383927px"/><path d="M 36.253 31.87 C 36.731 31.587 36.728 30.894 36.246 30.616 L 11.577 16.373 L 3.185 11.528 L 2.215 10.969 C 0.844 10.178 0 8.714 0 7.131 L 0 0 L 11.577 6.684 L 19.968 11.528 L 38.87 22.441 L 39.962 23.071 L 42.313 24.428 C 44.68 25.795 44.707 29.203 42.362 30.607 L 40.043 31.995 L 36.994 33.799 Z" fill="rgb(30, 114, 238)" height="33.79916964285715px" id="RUK7JhF8E" transform="translate(0 14.374)" width="44.10456407145295px"/><path d="M 3.051 12.033 C 3.051 12.7 3.165 13.269 3.393 13.741 C 3.62 14.213 3.938 14.603 4.345 14.913 C 4.751 15.206 5.215 15.425 5.736 15.572 C 6.273 15.702 6.85 15.767 7.469 15.767 C 8.136 15.767 8.705 15.694 9.177 15.547 C 9.649 15.384 10.031 15.181 10.324 14.937 C 10.617 14.693 10.829 14.416 10.959 14.107 C 11.089 13.782 11.154 13.456 11.154 13.131 C 11.154 12.464 10.999 11.976 10.69 11.666 C 10.397 11.341 10.072 11.113 9.714 10.983 C 9.096 10.755 8.372 10.544 7.542 10.349 C 6.728 10.137 5.719 9.869 4.515 9.543 C 3.767 9.348 3.14 9.096 2.636 8.786 C 2.148 8.461 1.757 8.103 1.464 7.713 C 1.172 7.322 0.96 6.907 0.83 6.468 C 0.716 6.028 0.659 5.581 0.659 5.125 C 0.659 4.247 0.838 3.49 1.196 2.856 C 1.57 2.205 2.058 1.668 2.66 1.245 C 3.262 0.822 3.946 0.513 4.711 0.317 C 5.475 0.106 6.248 0 7.029 0 C 7.94 0 8.795 0.122 9.592 0.366 C 10.406 0.594 11.113 0.944 11.715 1.416 C 12.334 1.887 12.822 2.473 13.18 3.173 C 13.538 3.856 13.717 4.654 13.717 5.565 L 10.666 5.565 C 10.585 4.442 10.202 3.653 9.519 3.197 C 8.835 2.725 7.965 2.49 6.907 2.49 C 6.549 2.49 6.183 2.53 5.809 2.612 C 5.435 2.677 5.093 2.799 4.784 2.978 C 4.475 3.14 4.214 3.368 4.003 3.661 C 3.807 3.954 3.71 4.32 3.71 4.759 C 3.71 5.378 3.897 5.866 4.271 6.224 C 4.662 6.565 5.166 6.826 5.785 7.005 C 5.85 7.021 6.102 7.094 6.541 7.224 C 6.997 7.338 7.501 7.469 8.054 7.615 C 8.608 7.761 9.145 7.908 9.665 8.054 C 10.202 8.184 10.585 8.282 10.812 8.347 C 11.382 8.526 11.878 8.77 12.301 9.079 C 12.724 9.388 13.074 9.746 13.351 10.153 C 13.644 10.544 13.855 10.967 13.985 11.422 C 14.132 11.878 14.205 12.334 14.205 12.789 C 14.205 13.766 14.002 14.603 13.595 15.303 C 13.204 15.987 12.683 16.548 12.033 16.987 C 11.382 17.427 10.641 17.744 9.812 17.939 C 8.982 18.151 8.136 18.256 7.273 18.256 C 6.281 18.256 5.345 18.134 4.466 17.89 C 3.588 17.646 2.823 17.272 2.172 16.768 C 1.521 16.263 1.001 15.62 0.61 14.839 C 0.22 14.042 0.016 13.106 0 12.033 Z" fill="rgb(12, 33, 57)" height="18.256366071428566px" id="yfIDGwtI4" transform="translate(60.241 11.336)" width="14.204830357142853px"/><path d="M 0 3.783 L 2.099 3.783 L 2.099 0 L 4.881 0 L 4.881 3.783 L 7.395 3.783 L 7.395 5.858 L 4.881 5.858 L 4.881 12.594 C 4.881 12.887 4.889 13.139 4.906 13.351 C 4.938 13.562 4.995 13.741 5.077 13.888 C 5.174 14.034 5.313 14.148 5.492 14.229 C 5.67 14.294 5.915 14.327 6.224 14.327 C 6.419 14.327 6.614 14.327 6.809 14.327 C 7.005 14.311 7.2 14.278 7.395 14.229 L 7.395 16.377 C 7.086 16.41 6.785 16.442 6.492 16.475 C 6.199 16.507 5.898 16.523 5.589 16.523 C 4.857 16.523 4.263 16.458 3.807 16.328 C 3.368 16.182 3.018 15.978 2.758 15.718 C 2.514 15.441 2.343 15.1 2.245 14.693 C 2.164 14.286 2.115 13.822 2.099 13.302 L 2.099 5.858 L 0 5.858 Z" fill="rgb(12, 33, 57)" height="16.523473214285715px" id="BCnjJ6DIx" transform="translate(75.457 12.776)" width="7.395339285714272px"/><path d="M 11.252 10.153 C 11.252 10.495 11.292 10.739 11.374 10.885 C 11.471 11.032 11.65 11.105 11.911 11.105 C 11.992 11.105 12.09 11.105 12.203 11.105 C 12.317 11.105 12.447 11.089 12.594 11.056 L 12.594 12.985 C 12.496 13.017 12.366 13.05 12.203 13.082 C 12.057 13.131 11.902 13.172 11.74 13.204 C 11.577 13.237 11.414 13.261 11.252 13.277 C 11.089 13.294 10.951 13.302 10.837 13.302 C 10.267 13.302 9.795 13.188 9.421 12.96 C 9.047 12.732 8.803 12.334 8.689 11.764 C 8.136 12.301 7.452 12.692 6.639 12.936 C 5.841 13.18 5.068 13.302 4.32 13.302 C 3.751 13.302 3.205 13.22 2.685 13.058 C 2.164 12.911 1.7 12.692 1.294 12.399 C 0.903 12.09 0.586 11.707 0.342 11.252 C 0.114 10.78 0 10.235 0 9.616 C 0 8.835 0.138 8.201 0.415 7.713 C 0.708 7.224 1.082 6.842 1.538 6.566 C 2.009 6.289 2.53 6.094 3.1 5.98 C 3.685 5.85 4.271 5.752 4.857 5.687 C 5.361 5.589 5.841 5.524 6.297 5.492 C 6.753 5.443 7.151 5.37 7.493 5.272 C 7.851 5.174 8.128 5.028 8.323 4.833 C 8.534 4.621 8.64 4.312 8.64 3.905 C 8.64 3.547 8.551 3.254 8.372 3.026 C 8.209 2.799 7.997 2.628 7.737 2.514 C 7.493 2.384 7.216 2.302 6.907 2.27 C 6.598 2.221 6.305 2.197 6.028 2.197 C 5.247 2.197 4.605 2.359 4.1 2.685 C 3.596 3.01 3.311 3.515 3.246 4.198 L 0.464 4.198 C 0.512 3.384 0.708 2.709 1.05 2.172 C 1.391 1.635 1.822 1.204 2.343 0.879 C 2.88 0.553 3.482 0.325 4.149 0.195 C 4.816 0.065 5.5 0 6.199 0 C 6.818 0 7.428 0.065 8.03 0.195 C 8.632 0.325 9.169 0.537 9.641 0.83 C 10.129 1.123 10.519 1.505 10.812 1.977 C 11.105 2.433 11.252 2.994 11.252 3.661 Z M 8.469 6.639 C 8.046 6.915 7.525 7.086 6.907 7.151 C 6.289 7.2 5.67 7.281 5.052 7.395 C 4.759 7.444 4.475 7.517 4.198 7.615 C 3.921 7.696 3.677 7.818 3.466 7.981 C 3.254 8.128 3.083 8.331 2.953 8.591 C 2.839 8.835 2.782 9.136 2.782 9.494 C 2.782 9.803 2.872 10.064 3.051 10.275 C 3.23 10.487 3.441 10.658 3.685 10.788 C 3.946 10.902 4.222 10.983 4.515 11.032 C 4.824 11.081 5.101 11.105 5.345 11.105 C 5.654 11.105 5.988 11.065 6.346 10.983 C 6.704 10.902 7.037 10.764 7.346 10.568 C 7.672 10.373 7.94 10.129 8.152 9.836 C 8.363 9.527 8.469 9.153 8.469 8.713 Z" fill="rgb(12, 33, 57)" height="13.301848214285712px" id="VDd7328YZ" transform="translate(84.17 16.217)" width="12.593919676916926px"/><path d="M 9.128 4.564 C 9.014 3.783 8.697 3.197 8.176 2.807 C 7.672 2.4 7.029 2.197 6.248 2.197 C 5.89 2.197 5.508 2.262 5.101 2.392 C 4.694 2.506 4.32 2.734 3.979 3.075 C 3.637 3.401 3.352 3.864 3.124 4.466 C 2.896 5.052 2.783 5.825 2.783 6.785 C 2.783 7.306 2.839 7.827 2.953 8.347 C 3.083 8.868 3.278 9.332 3.539 9.738 C 3.816 10.145 4.165 10.479 4.589 10.739 C 5.012 10.983 5.524 11.105 6.126 11.105 C 6.94 11.105 7.607 10.853 8.127 10.349 C 8.665 9.844 8.998 9.136 9.128 8.225 L 11.911 8.225 C 11.65 9.869 11.024 11.13 10.032 12.008 C 9.054 12.871 7.753 13.302 6.126 13.302 C 5.134 13.302 4.255 13.139 3.491 12.814 C 2.741 12.472 2.107 12.016 1.586 11.447 C 1.066 10.861 0.667 10.17 0.391 9.372 C 0.13 8.575 0 7.713 0 6.785 C 0 5.841 0.13 4.955 0.391 4.125 C 0.651 3.295 1.041 2.579 1.562 1.977 C 2.082 1.359 2.726 0.879 3.491 0.537 C 4.271 0.179 5.183 0 6.224 0 C 6.956 0 7.647 0.098 8.298 0.293 C 8.965 0.472 9.551 0.748 10.055 1.123 C 10.577 1.497 10.999 1.969 11.325 2.538 C 11.65 3.108 11.846 3.783 11.911 4.564 Z" fill="rgb(12, 33, 57)" height="13.301848214285712px" id="p8PKzsSeG" transform="translate(97.806 16.217)" width="11.910544642857133px"/><path d="M 0 0 L 2.782 0 L 2.782 9.909 L 7.811 4.808 L 11.228 4.808 L 6.395 9.445 L 11.691 17.426 L 8.299 17.426 L 4.442 11.3 L 2.782 12.911 L 2.782 17.426 L 0 17.426 Z" fill="rgb(12, 33, 57)" height="17.426455357142856px" id="SxlaJV7xq" transform="translate(112.051 11.751)" width="11.691428571428574px"/><path d="M 5.052 10.226 L 10.959 10.226 L 8.055 2.099 L 8.005 2.099 Z M 6.786 0 L 9.348 0 L 16.157 17.426 L 13.595 17.426 L 11.691 12.179 L 4.32 12.179 L 2.368 17.426 L 0 17.426 Z" fill="rgb(12, 33, 57)" height="17.42645535288538px" id="SwNYnsyeV" transform="translate(123.476 11.751)" width="16.15723217691692px"/><path d="M 10.446 12.618 L 8.494 12.618 L 8.494 10.617 L 8.444 10.617 C 8.005 11.398 7.444 11.976 6.76 12.35 C 6.078 12.708 5.272 12.887 4.344 12.887 C 3.514 12.887 2.823 12.781 2.27 12.57 C 1.717 12.342 1.269 12.024 0.927 11.618 C 0.585 11.211 0.342 10.731 0.195 10.178 C 0.065 9.608 0 8.982 0 8.298 L 0 0 L 2.074 0 L 2.074 8.542 C 2.074 9.323 2.302 9.942 2.758 10.397 C 3.214 10.853 3.84 11.081 4.637 11.081 C 5.272 11.081 5.817 10.983 6.272 10.788 C 6.744 10.593 7.135 10.316 7.444 9.958 C 7.753 9.6 7.981 9.185 8.127 8.713 C 8.29 8.225 8.372 7.696 8.372 7.127 L 8.372 0 L 10.446 0 Z" fill="rgb(12, 33, 57)" height="12.886892857142858px" id="p8b165L2G" transform="translate(141.011 16.559)" width="10.446071428571457px"/><path d="M 0 0.296 L 1.953 0.296 L 1.953 2.956 L 2.002 2.956 C 2.505 1.931 3.124 1.175 3.856 0.687 C 4.589 0.198 5.516 -0.029 6.638 0.003 L 6.638 2.2 C 5.808 2.2 5.101 2.314 4.515 2.541 C 3.93 2.769 3.457 3.103 3.1 3.542 C 2.741 3.981 2.481 4.518 2.319 5.153 C 2.156 5.771 2.074 6.487 2.074 7.301 L 2.074 12.914 L 0 12.914 Z" fill="rgb(12, 33, 57)" height="12.914295364047526px" id="H6OlV0r2B" transform="translate(154.5 16.263)" width="6.638303571428594px"/><path d="M 11.862 12.862 C 11.504 13.074 11.008 13.18 10.373 13.18 C 9.836 13.18 9.405 13.033 9.08 12.74 C 8.771 12.431 8.615 11.935 8.615 11.252 C 8.047 11.935 7.379 12.431 6.615 12.74 C 5.866 13.033 5.052 13.18 4.174 13.18 C 3.604 13.18 3.059 13.115 2.539 12.985 C 2.034 12.854 1.595 12.651 1.221 12.374 C 0.847 12.098 0.545 11.74 0.317 11.3 C 0.106 10.845 0 10.3 0 9.665 C 0 8.949 0.122 8.363 0.366 7.908 C 0.61 7.452 0.927 7.086 1.318 6.81 C 1.725 6.517 2.18 6.297 2.685 6.151 C 3.206 6.004 3.734 5.882 4.271 5.784 C 4.841 5.671 5.378 5.589 5.882 5.54 C 6.403 5.475 6.858 5.394 7.249 5.296 C 7.639 5.182 7.948 5.028 8.176 4.833 C 8.404 4.621 8.518 4.32 8.518 3.93 C 8.518 3.474 8.429 3.108 8.25 2.831 C 8.087 2.555 7.867 2.343 7.591 2.197 C 7.331 2.05 7.029 1.953 6.687 1.904 C 6.362 1.855 6.037 1.831 5.711 1.831 C 4.833 1.831 4.1 2.001 3.515 2.343 C 2.929 2.668 2.612 3.295 2.562 4.222 L 0.488 4.222 C 0.521 3.441 0.684 2.782 0.976 2.245 C 1.269 1.709 1.66 1.277 2.148 0.952 C 2.636 0.61 3.189 0.366 3.808 0.22 C 4.442 0.073 5.117 0 5.833 0 C 6.403 0 6.964 0.041 7.517 0.122 C 8.087 0.203 8.6 0.374 9.055 0.635 C 9.511 0.879 9.876 1.228 10.153 1.684 C 10.43 2.14 10.568 2.734 10.568 3.466 L 10.568 9.958 C 10.568 10.446 10.592 10.804 10.642 11.032 C 10.706 11.26 10.902 11.374 11.227 11.374 C 11.407 11.374 11.618 11.333 11.862 11.252 Z M 8.494 6.395 C 8.233 6.59 7.892 6.736 7.468 6.834 C 7.046 6.915 6.598 6.989 6.127 7.054 C 5.671 7.102 5.207 7.168 4.735 7.249 C 4.263 7.314 3.84 7.428 3.466 7.591 C 3.092 7.753 2.782 7.989 2.539 8.298 C 2.311 8.591 2.197 8.998 2.197 9.519 C 2.197 9.86 2.262 10.153 2.392 10.397 C 2.539 10.625 2.718 10.812 2.929 10.959 C 3.157 11.105 3.417 11.211 3.71 11.276 C 4.003 11.341 4.312 11.374 4.638 11.374 C 5.321 11.374 5.907 11.284 6.395 11.105 C 6.883 10.91 7.282 10.674 7.591 10.397 C 7.899 10.104 8.127 9.795 8.275 9.47 C 8.421 9.128 8.494 8.811 8.494 8.518 Z" fill="rgb(12, 33, 57)" height="13.179767861400325px" id="vQsO1Gjnc" transform="translate(162.017 16.266)" width="11.86232142857142px"/><path d="M 0 0 L 4.102 0 L 4.102 0.666 L 0.79 0.666 L 0.79 2.554 L 3.877 2.554 L 3.877 3.22 L 0.79 3.22 L 0.79 5.275 L 4.127 5.275 L 4.127 5.941 L 0 5.941 Z" fill="rgb(130, 128, 137)" height="5.940883928571431px" id="TP77wgWWk" transform="translate(60.129 39.323)" width="4.126964285714287px"/><path d="M 0 0 L 0.79 0 L 0.79 5.275 L 3.936 5.275 L 3.936 5.941 L 0 5.941 Z" fill="rgb(130, 128, 137)" height="5.940883928571431px" id="gfcHpWq60" transform="translate(65.798 39.323)" width="3.9355446428571526px"/><path d="M 0 0 L 4.102 0 L 4.102 0.666 L 0.79 0.666 L 0.79 2.554 L 3.877 2.554 L 3.877 3.22 L 0.79 3.22 L 0.79 5.275 L 4.127 5.275 L 4.127 5.941 L 0 5.941 Z" fill="rgb(130, 128, 137)" height="5.940883928571431px" id="Vcyceh4Dx" transform="translate(71.004 39.323)" width="4.126964285714294px"/><path d="M 2.987 5.941 L 2.088 5.941 L 0 0 L 0.849 0 L 2.546 5.15 L 2.563 5.15 L 4.277 0 L 5.1 0 Z" fill="rgb(130, 128, 137)" height="5.940883928571431px" id="jtfHmmbSC" transform="translate(76.024 39.323)" width="5.100464285714295px"/><path d="M 1.722 3.486 L 3.736 3.486 L 2.746 0.716 L 2.729 0.716 Z M 2.313 0 L 3.187 0 L 5.508 5.941 L 4.635 5.941 L 3.986 4.152 L 1.473 4.152 L 0.807 5.941 L 0 5.941 Z" fill="rgb(130, 128, 137)" height="5.940883954116281px" id="kL9zFXNT2" transform="translate(81.262 39.323)" width="5.508151836803975px"/><path d="M 1.98 0.666 L 0 0.666 L 0 0 L 4.751 0 L 4.751 0.666 L 2.771 0.666 L 2.771 5.941 L 1.98 5.941 Z" fill="rgb(130, 128, 137)" height="5.940883928571431px" id="BJZBgPfqE" transform="translate(86.542 39.323)" width="4.751116071428569px"/><path d="M 0 0 L 4.102 0 L 4.102 0.666 L 0.79 0.666 L 0.79 2.554 L 3.877 2.554 L 3.877 3.22 L 0.79 3.22 L 0.79 5.275 L 4.127 5.275 L 4.127 5.941 L 0 5.941 Z" fill="rgb(130, 128, 137)" height="5.940883928571431px" id="swSmLApqB" transform="translate(92.535 39.323)" width="4.126964285714294px"/><path d="M 3.087 3.511 L 3.087 5.941 L 2.296 5.941 L 2.296 3.511 L 0 0 L 0.941 0 L 2.722 2.829 L 4.46 0 L 5.359 0 Z" fill="rgb(130, 128, 137)" height="5.940883928571431px" id="mKgK913Ji" transform="translate(100.469 39.323)" width="5.358571428571409px"/><path d="M 0.791 3.112 C 0.791 3.411 0.829 3.708 0.907 4.002 C 0.984 4.291 1.106 4.551 1.273 4.784 C 1.439 5.017 1.653 5.206 1.913 5.35 C 2.174 5.489 2.485 5.558 2.845 5.558 C 3.206 5.558 3.516 5.489 3.777 5.35 C 4.038 5.206 4.252 5.017 4.418 4.784 C 4.585 4.551 4.706 4.291 4.784 4.002 C 4.862 3.708 4.901 3.411 4.901 3.112 C 4.901 2.812 4.862 2.518 4.784 2.23 C 4.706 1.936 4.585 1.672 4.418 1.439 C 4.252 1.206 4.038 1.021 3.777 0.882 C 3.516 0.738 3.206 0.666 2.845 0.666 C 2.485 0.666 2.174 0.738 1.913 0.882 C 1.653 1.021 1.439 1.206 1.273 1.439 C 1.106 1.672 0.984 1.936 0.907 2.23 C 0.829 2.518 0.791 2.812 0.791 3.112 Z M 0 3.112 C 0 2.707 0.058 2.319 0.175 1.947 C 0.297 1.57 0.476 1.237 0.715 0.949 C 0.954 0.66 1.25 0.43 1.606 0.258 C 1.96 0.086 2.374 0 2.845 0 C 3.317 0 3.73 0.086 4.085 0.258 C 4.44 0.43 4.737 0.66 4.976 0.949 C 5.214 1.237 5.391 1.57 5.508 1.947 C 5.63 2.319 5.691 2.707 5.691 3.112 C 5.691 3.517 5.63 3.908 5.508 4.285 C 5.391 4.657 5.214 4.987 4.976 5.275 C 4.737 5.564 4.44 5.794 4.085 5.966 C 3.73 6.132 3.317 6.215 2.845 6.215 C 2.374 6.215 1.96 6.132 1.606 5.966 C 1.25 5.794 0.954 5.564 0.715 5.275 C 0.476 4.987 0.297 4.657 0.175 4.285 C 0.058 3.908 0 3.517 0 3.112 Z" fill="rgb(130, 128, 137)" height="6.215491062913614px" id="VMysTOyl5" transform="translate(106.747 39.181)" width="5.6905357653753725px"/><path d="M 4.776 3.794 C 4.776 4.554 4.574 5.126 4.169 5.508 C 3.764 5.885 3.187 6.074 2.439 6.074 C 1.673 6.074 1.073 5.894 0.641 5.533 C 0.214 5.167 0 4.587 0 3.794 L 0 0 L 0.791 0 L 0.791 3.794 C 0.791 4.327 0.932 4.732 1.215 5.009 C 1.498 5.281 1.905 5.417 2.439 5.417 C 2.943 5.417 3.326 5.281 3.587 5.009 C 3.853 4.732 3.986 4.327 3.986 3.794 L 3.986 0 L 4.776 0 Z" fill="rgb(130, 128, 137)" height="6.074062499999997px" id="jDwQENBZu" transform="translate(113.95 39.323)" width="4.776160714285723px"/><path d="M 0 0 L 2.796 0 C 3.362 0 3.803 0.139 4.119 0.416 C 4.44 0.693 4.601 1.073 4.601 1.556 C 4.601 1.917 4.518 2.233 4.352 2.504 C 4.191 2.776 3.931 2.962 3.57 3.062 L 3.57 3.079 C 3.742 3.112 3.88 3.167 3.986 3.245 C 4.097 3.323 4.183 3.417 4.244 3.528 C 4.311 3.633 4.358 3.753 4.385 3.886 C 4.419 4.019 4.443 4.158 4.46 4.302 C 4.471 4.446 4.48 4.593 4.485 4.743 C 4.49 4.893 4.504 5.039 4.527 5.184 C 4.548 5.328 4.58 5.467 4.618 5.6 C 4.662 5.727 4.726 5.841 4.81 5.941 L 3.928 5.941 C 3.872 5.88 3.833 5.797 3.811 5.691 C 3.794 5.586 3.783 5.469 3.777 5.342 C 3.772 5.209 3.767 5.067 3.761 4.917 C 3.756 4.768 3.739 4.621 3.712 4.477 C 3.689 4.332 3.661 4.196 3.628 4.069 C 3.595 3.936 3.542 3.822 3.47 3.728 C 3.398 3.628 3.304 3.55 3.187 3.495 C 3.07 3.434 2.915 3.403 2.721 3.403 L 0.791 3.403 L 0.791 5.941 L 0 5.941 Z M 2.438 2.738 C 2.621 2.738 2.796 2.724 2.962 2.696 C 3.129 2.668 3.273 2.615 3.395 2.538 C 3.523 2.455 3.622 2.346 3.695 2.213 C 3.772 2.075 3.811 1.897 3.811 1.681 C 3.811 1.381 3.728 1.137 3.561 0.949 C 3.395 0.76 3.126 0.666 2.754 0.666 L 0.791 0.666 L 0.791 2.738 Z" fill="rgb(130, 128, 137)" height="5.940883954116281px" id="pReg1wcGa" transform="translate(120.571 39.323)" width="4.809553571428566px"/><path d="M 0.791 2.554 L 2.371 2.554 C 2.821 2.554 3.142 2.477 3.336 2.321 C 3.536 2.161 3.636 1.922 3.636 1.606 C 3.636 1.395 3.603 1.229 3.536 1.107 C 3.469 0.985 3.378 0.89 3.262 0.824 C 3.145 0.757 3.009 0.716 2.854 0.699 C 2.704 0.677 2.543 0.666 2.371 0.666 L 0.791 0.666 Z M 0 0 L 2.155 0 C 2.283 0 2.418 0.003 2.562 0.008 C 2.713 0.008 2.859 0.017 3.003 0.033 C 3.148 0.044 3.28 0.064 3.403 0.092 C 3.531 0.119 3.639 0.161 3.727 0.216 C 3.922 0.333 4.085 0.494 4.218 0.699 C 4.357 0.904 4.427 1.157 4.427 1.456 C 4.427 1.772 4.349 2.047 4.193 2.28 C 4.043 2.507 3.827 2.676 3.545 2.787 L 3.545 2.804 C 3.91 2.882 4.191 3.048 4.384 3.303 C 4.579 3.558 4.676 3.869 4.676 4.235 C 4.676 4.451 4.637 4.662 4.559 4.868 C 4.482 5.073 4.366 5.256 4.209 5.417 C 4.06 5.572 3.872 5.7 3.644 5.799 C 3.422 5.894 3.164 5.941 2.87 5.941 L 0 5.941 Z M 0.791 5.275 L 2.771 5.275 C 3.12 5.275 3.391 5.181 3.586 4.992 C 3.785 4.804 3.885 4.543 3.885 4.21 C 3.885 4.016 3.849 3.855 3.777 3.728 C 3.705 3.6 3.608 3.5 3.486 3.428 C 3.37 3.35 3.233 3.298 3.078 3.27 C 2.923 3.237 2.762 3.22 2.596 3.22 L 0.791 3.22 Z" fill="rgb(130, 128, 137)" height="5.940883954116281px" id="wS77tk3Ok" transform="translate(129.748 39.323)" width="4.675982176916932px"/><path d="M 4.776 3.794 C 4.776 4.554 4.574 5.126 4.169 5.508 C 3.764 5.885 3.187 6.074 2.439 6.074 C 1.673 6.074 1.073 5.894 0.641 5.533 C 0.214 5.167 0 4.587 0 3.794 L 0 0 L 0.791 0 L 0.791 3.794 C 0.791 4.327 0.932 4.732 1.215 5.009 C 1.498 5.281 1.905 5.417 2.439 5.417 C 2.943 5.417 3.326 5.281 3.587 5.009 C 3.853 4.732 3.986 4.327 3.986 3.794 L 3.986 0 L 4.776 0 Z" fill="rgb(130, 128, 137)" height="6.074062499999997px" id="t4YAAfu0G" transform="translate(135.992 39.323)" width="4.776160714285737px"/><path d="M 3.777 1.88 C 3.733 1.453 3.578 1.145 3.312 0.957 C 3.051 0.763 2.716 0.666 2.305 0.666 C 2.138 0.666 1.975 0.682 1.814 0.716 C 1.653 0.749 1.509 0.804 1.381 0.882 C 1.259 0.96 1.159 1.065 1.081 1.198 C 1.01 1.326 0.973 1.487 0.973 1.681 C 0.973 1.864 1.026 2.014 1.131 2.13 C 1.242 2.241 1.387 2.332 1.565 2.405 C 1.747 2.477 1.952 2.538 2.18 2.588 C 2.407 2.632 2.637 2.682 2.871 2.737 C 3.109 2.793 3.342 2.86 3.569 2.937 C 3.797 3.009 3.999 3.109 4.177 3.237 C 4.36 3.364 4.504 3.525 4.609 3.719 C 4.72 3.913 4.776 4.158 4.776 4.451 C 4.776 4.768 4.703 5.039 4.559 5.267 C 4.421 5.489 4.241 5.672 4.019 5.816 C 3.797 5.955 3.547 6.055 3.27 6.116 C 2.998 6.182 2.726 6.215 2.454 6.215 C 2.121 6.215 1.805 6.174 1.506 6.091 C 1.212 6.007 0.952 5.883 0.724 5.716 C 0.502 5.544 0.324 5.328 0.192 5.067 C 0.064 4.801 0 4.488 0 4.127 L 0.748 4.127 C 0.748 4.377 0.796 4.593 0.89 4.776 C 0.99 4.954 1.118 5.1 1.273 5.217 C 1.434 5.333 1.62 5.419 1.831 5.475 C 2.041 5.53 2.258 5.558 2.48 5.558 C 2.657 5.558 2.834 5.541 3.012 5.508 C 3.195 5.475 3.359 5.419 3.503 5.342 C 3.647 5.259 3.764 5.148 3.852 5.009 C 3.941 4.87 3.986 4.693 3.986 4.476 C 3.986 4.271 3.93 4.105 3.819 3.977 C 3.713 3.85 3.569 3.747 3.386 3.669 C 3.209 3.586 3.006 3.52 2.779 3.47 C 2.552 3.42 2.319 3.37 2.08 3.32 C 1.847 3.264 1.617 3.203 1.39 3.137 C 1.162 3.065 0.957 2.973 0.774 2.862 C 0.596 2.746 0.452 2.599 0.341 2.421 C 0.236 2.238 0.183 2.011 0.183 1.739 C 0.183 1.439 0.244 1.182 0.366 0.965 C 0.488 0.743 0.649 0.563 0.849 0.424 C 1.054 0.28 1.284 0.175 1.539 0.108 C 1.8 0.036 2.066 0 2.337 0 C 2.643 0 2.926 0.036 3.187 0.108 C 3.447 0.18 3.675 0.294 3.869 0.449 C 4.069 0.605 4.224 0.802 4.335 1.04 C 4.451 1.273 4.515 1.553 4.527 1.88 Z" fill="rgb(130, 128, 137)" height="6.215491071428573px" id="qjKJdfp9D" transform="translate(142.272 39.181)" width="4.776160714285709px"/><path d="M 0 0 L 0.79 0 L 0.79 5.941 L 0 5.941 Z" fill="rgb(130, 128, 137)" height="5.940883928571431px" id="A7h9ziYLN" transform="translate(148.625 39.323)" width="1px"/><path d="M 0 0 L 0.84 0 L 3.969 4.818 L 3.986 4.818 L 3.986 0 L 4.734 0 L 4.734 5.941 L 3.869 5.941 L 0.765 1.173 L 0.748 1.173 L 0.748 5.941 L 0 5.941 Z" fill="rgb(130, 128, 137)" height="5.940883928571431px" id="EgCdgAcXV" transform="translate(151.319 39.323)" width="4.733928571428578px"/><path d="M 0 0 L 4.102 0 L 4.102 0.666 L 0.791 0.666 L 0.791 2.554 L 3.877 2.554 L 3.877 3.22 L 0.791 3.22 L 0.791 5.275 L 4.127 5.275 L 4.127 5.941 L 0 5.941 Z" fill="rgb(130, 128, 137)" height="5.940883928571431px" id="h3tjV0Xjl" transform="translate(157.914 39.323)" width="4.12696428571428px"/><path d="M 3.777 1.88 C 3.733 1.453 3.578 1.145 3.312 0.957 C 3.051 0.763 2.716 0.666 2.305 0.666 C 2.138 0.666 1.975 0.682 1.814 0.716 C 1.653 0.749 1.509 0.804 1.381 0.882 C 1.259 0.96 1.159 1.065 1.081 1.198 C 1.01 1.326 0.973 1.487 0.973 1.681 C 0.973 1.864 1.026 2.014 1.131 2.13 C 1.242 2.241 1.387 2.332 1.565 2.405 C 1.747 2.477 1.953 2.538 2.18 2.588 C 2.407 2.632 2.637 2.682 2.871 2.737 C 3.109 2.793 3.342 2.86 3.569 2.937 C 3.797 3.009 3.999 3.109 4.177 3.237 C 4.36 3.364 4.504 3.525 4.609 3.719 C 4.72 3.913 4.776 4.158 4.776 4.451 C 4.776 4.768 4.703 5.039 4.559 5.267 C 4.421 5.489 4.241 5.672 4.019 5.816 C 3.797 5.955 3.548 6.055 3.27 6.116 C 2.998 6.182 2.726 6.215 2.454 6.215 C 2.121 6.215 1.805 6.174 1.506 6.091 C 1.212 6.007 0.952 5.883 0.724 5.716 C 0.502 5.544 0.324 5.328 0.192 5.067 C 0.064 4.801 0 4.488 0 4.127 L 0.748 4.127 C 0.748 4.377 0.796 4.593 0.89 4.776 C 0.99 4.954 1.118 5.1 1.273 5.217 C 1.434 5.333 1.62 5.419 1.831 5.475 C 2.041 5.53 2.258 5.558 2.48 5.558 C 2.657 5.558 2.834 5.541 3.012 5.508 C 3.195 5.475 3.359 5.419 3.503 5.342 C 3.647 5.259 3.764 5.148 3.852 5.009 C 3.941 4.87 3.986 4.693 3.986 4.476 C 3.986 4.271 3.93 4.105 3.819 3.977 C 3.713 3.85 3.569 3.747 3.386 3.669 C 3.209 3.586 3.006 3.52 2.778 3.47 C 2.552 3.42 2.319 3.37 2.08 3.32 C 1.847 3.264 1.617 3.203 1.39 3.137 C 1.162 3.065 0.957 2.973 0.774 2.862 C 0.596 2.746 0.452 2.599 0.341 2.421 C 0.236 2.238 0.183 2.011 0.183 1.739 C 0.183 1.439 0.244 1.182 0.366 0.965 C 0.488 0.743 0.649 0.563 0.849 0.424 C 1.054 0.28 1.284 0.175 1.539 0.108 C 1.8 0.036 2.066 0 2.338 0 C 2.643 0 2.926 0.036 3.187 0.108 C 3.447 0.18 3.675 0.294 3.869 0.449 C 4.069 0.605 4.224 0.802 4.335 1.04 C 4.451 1.273 4.515 1.553 4.527 1.88 Z" fill="rgb(130, 128, 137)" height="6.215491071428573px" id="rpm7O7nDD" transform="translate(163.242 39.181)" width="4.776160714285737px"/><path d="M 3.778 1.88 C 3.733 1.453 3.578 1.145 3.312 0.957 C 3.052 0.763 2.716 0.666 2.305 0.666 C 2.139 0.666 1.975 0.682 1.814 0.716 C 1.653 0.749 1.51 0.804 1.382 0.882 C 1.259 0.96 1.16 1.065 1.082 1.198 C 1.01 1.326 0.974 1.487 0.974 1.681 C 0.974 1.864 1.026 2.014 1.132 2.13 C 1.243 2.241 1.387 2.332 1.565 2.405 C 1.747 2.477 1.952 2.538 2.18 2.588 C 2.408 2.632 2.638 2.682 2.871 2.737 C 3.109 2.793 3.342 2.86 3.57 2.937 C 3.797 3.009 4 3.109 4.177 3.237 C 4.361 3.364 4.504 3.525 4.61 3.719 C 4.721 3.913 4.776 4.158 4.776 4.451 C 4.776 4.768 4.704 5.039 4.56 5.267 C 4.422 5.489 4.241 5.672 4.019 5.816 C 3.797 5.955 3.547 6.055 3.271 6.116 C 2.998 6.182 2.726 6.215 2.455 6.215 C 2.122 6.215 1.806 6.174 1.507 6.091 C 1.212 6.007 0.952 5.883 0.724 5.716 C 0.503 5.544 0.325 5.328 0.192 5.067 C 0.064 4.801 0 4.488 0 4.127 L 0.749 4.127 C 0.749 4.377 0.797 4.593 0.891 4.776 C 0.991 4.954 1.118 5.1 1.274 5.217 C 1.434 5.333 1.621 5.419 1.831 5.475 C 2.042 5.53 2.258 5.558 2.48 5.558 C 2.658 5.558 2.834 5.541 3.012 5.508 C 3.196 5.475 3.359 5.419 3.503 5.342 C 3.648 5.259 3.764 5.148 3.853 5.009 C 3.941 4.87 3.986 4.693 3.986 4.476 C 3.986 4.271 3.931 4.105 3.82 3.977 C 3.714 3.85 3.57 3.747 3.386 3.669 C 3.21 3.586 3.007 3.52 2.779 3.47 C 2.552 3.42 2.319 3.37 2.08 3.32 C 1.847 3.264 1.618 3.203 1.39 3.137 C 1.163 3.065 0.958 2.973 0.774 2.862 C 0.597 2.746 0.453 2.599 0.342 2.421 C 0.236 2.238 0.184 2.011 0.184 1.739 C 0.184 1.439 0.245 1.182 0.366 0.965 C 0.488 0.743 0.649 0.563 0.85 0.424 C 1.054 0.28 1.285 0.175 1.54 0.108 C 1.8 0.036 2.066 0 2.338 0 C 2.644 0 2.927 0.036 3.187 0.108 C 3.448 0.18 3.675 0.294 3.87 0.449 C 4.069 0.605 4.224 0.802 4.335 1.04 C 4.452 1.273 4.516 1.553 4.527 1.88 Z" fill="rgb(130, 128, 137)" height="6.215491071428573px" id="mJ_SZbZ3z" transform="translate(169.219 39.181)" width="4.776160714285709px"/></svg>)
Customizing GoHighLevel for Your Business Needs (Complete Guide)
Discover how to customize your GoHighLevel dashboard for better workflows, branding, and performance. Learn GHL customization, widgets, CSS, and dark mode tips.

Shawaiz Hassan

If your GoHighLevel dashboard feels generic, you’re not alone. Many users rely on the default setup, even though GoHighLevel offers powerful customization options.
Here’s the truth: a well-structured high level dashboard can improve your workflow, boost team productivity, and create a better experience for your clients. And no—you don’t need to be a developer to get started.
In this guide, you’ll learn how to approach GoHighLevel customization the right way. We’ll keep it practical, based on real platform capabilities, and aligned with Google’s quality guidelines.
Why Customizing Your GoHighLevel Dashboard Matters
GoHighLevel positions itself as an all-in-one CRM and marketing platform. According to its official help center, the goal is to centralize operations—funnels, CRM, automation, and communication—into one place.
But a default gohighlevel dashboard interface can feel cluttered. That’s where customization comes in.
Key Benefits
1. Faster Decision Making
A clean ghl dashboard shows only what matters. You don’t waste time hunting for data.
2. Better Branding
A custom ghl dashboard helps agencies present a professional, branded experience.
3. Improved User Experience
A structured dashboard ghl reduces confusion and improves navigation.
4. Client Retention
If you offer SaaS services, a polished go high level custom dashboard builds trust instantly.
Understanding the GoHighLevel Dashboard Interface
Before you customize anything, understand the core structure.
The gohighlevel crm dashboard interface includes:
Pipelines and opportunities
Conversations
Marketing campaigns
Reporting widgets
Each section plays a role. When you customize your go high level crm dashboard, you decide what deserves priority.
Core Areas You Can Customize
Let’s break down what you can actually control inside GoHighLevel.
1. Layout and Navigation
Start with structure.
A good highlevel dashboard template:
Highlights key metrics first
Reduces unnecessary clicks
Groups related tools together
Think of it like organizing your desk. If everything has a place, you work faster.
2. Custom CSS for Advanced Control
This is where things get interesting.
With gohighlevel custom css dashboard, you can:
Change colors and fonts
Adjust spacing
Improve button styles
Create go high level dark mode
Many users implement ghl dark mode using CSS to reduce eye strain and create a modern feel.
👉 Keep your CSS clean and tested. Avoid copying random code from unknown sources.
3. Custom Dashboard Widgets
Widgets turn your dashboard into a live control panel.
Using gohighlevel custom dashboard widgets, you can display:
Sales performance
Lead activity
Campaign results
A well-designed gohighlevel custom dashboards setup gives you insights at a glance.
4. Theme Customization
A ghl theme customizer helps you maintain consistency.
You can:
Apply brand colors
Standardize layouts
Improve readability
This matters a lot if you manage multiple client accounts.
Step-by-Step: Customize Your GHL Dashboard
Let’s keep this simple and actionable.
Step 1: Define Your Use Case
Ask yourself:
Are you customizing for internal use?
Or for clients?
A go high level dashboard for a team looks different from a SaaS client portal.
Step 2: Clean the Dashboard
Remove clutter.
Most users overload their ghl dashboard customization with unnecessary elements. Instead:
Keep essential widgets
Hide unused features
Focus on clarity
Step 3: Apply Branding
This is where your dashboard starts to feel “yours.”
With gohighlevel customization, you can:
Add your logo
Match your brand palette
Align typography
Consistency builds credibility.
Step 4: Add Custom CSS
Use gohighlevel custom css to refine the interface.
For example:
Enable go high level dark mode
Improve spacing
Adjust layout alignment
Keep changes small and test them often.
Step 5: Optimize Widgets
Place important data at the top:
Revenue
Leads
Conversion rates
A strong custom ghl dashboard answers key questions instantly.
Step 6: Test Responsiveness
Your high level dashboard must work on:
Desktop
Tablet
Mobile
Google emphasizes user experience across devices, and your dashboard should follow the same principle.
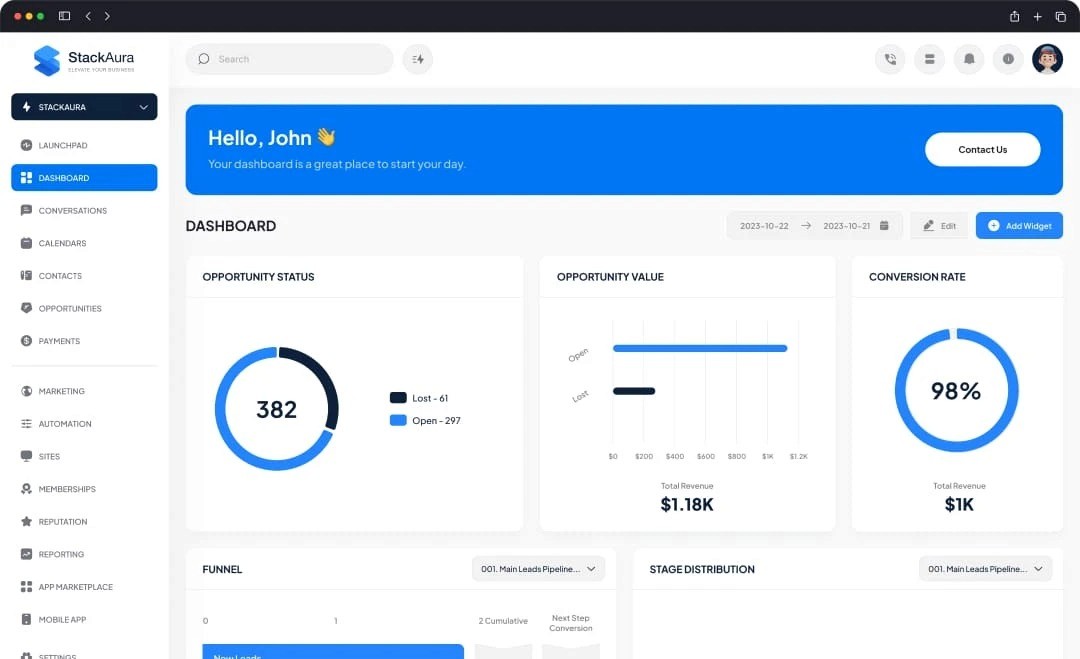
Visual Example of Dashboard Customization
Here’s an example of how a customized dashboard can look cleaner and more structured:
Notice how the layout feels more organized and focused. That’s the goal of gohighlevel dashboard customization.
Best Practices for GoHighLevel Customization
Keep It Simple
A simple highlevel dashboard always performs better than a complex one.
Focus on Usability
Design should help users act faster.
If your dashboard ghl looks good but slows you down, it fails.
Avoid Over-Customization
Too much CSS can:
Break layouts
Cause bugs after updates
Reduce performance
Use Trusted Resources
Rely on:
GoHighLevel Help Center
Verified community discussions
These sources ensure your gohighlevel custom css dashboard stays reliable.
Common Mistakes to Avoid
1. Overloading the Dashboard
Too many widgets create confusion.
2. Ignoring User Experience
A flashy go high level custom dashboard means nothing if users struggle to navigate.
3. Using Unverified Scripts
Avoid random code. Stick to trusted methods.
4. Skipping Mobile Optimization
Your go high level crm dashboard should work everywhere.
When Should You Use a Professional Service?
Customization can get technical.
If you want:
Advanced UI design
SaaS-ready dashboards
Clean and scalable setups
It’s better to work with experts.
👉 Explore our GoHighLevel Dashboard Customization Services to get a professional setup tailored to your business.
👉 You can also check custom GHL dashboard solutions at Stackaura for advanced configurations.
👉 For agencies, our GoHighLevel customization services help create scalable dashboards quickly.
Advanced Customization Ideas
1. SaaS Mode Dashboards
Create client-friendly gohighlevel custom dashboard experiences with:
White labeling
Simplified UI
Role-based access
2. Dark Mode Optimization
Using gohighlevel dark mode:
Reduces eye strain
Improves focus
Creates a modern interface
3. Automation Integration
Connect your dashboard ghl with:
CRM workflows
Email campaigns
Funnel tracking
This turns your dashboard into a command center.
Trusted Sources & References
To ensure accuracy and credibility:
GoHighLevel Help Center: https://help.gohighlevel.com
GoHighLevel Official Platform Overview
Industry UX best practices (Nielsen Norman Group)
These sources emphasize usability, clarity, and efficiency—key principles in any ghl dashboard customization.
Final Thoughts
Customizing your GoHighLevel dashboard is not about making it look fancy. It’s about making it work better for you.
A clean, structured high level dashboard:
Saves time
Reduces confusion
Improves performance
And yes, it can also look great while doing all that.
If you want a professional, scalable solution, Stackaura can help you build a dashboard that actually works—not just one that looks good.